• About
  • Work
  • Studio
  • News
  • Testimonials
  • Contact
Jonny Pipe Audio
  • About
  • Work
  • Studio
  • News
  • Testimonials
  • Contact

Stu Stu Studio!

Time for a wee write up on the BIG project of the year - building the new studio!
Moving up to Napier from Christchurch last year presented a whole lot of new challenges, not least of all was where to set up my workspace.

Looking around town it was pretty hard to find an ideal spot.  A studio needs to be a pretty specialised build, so even fitting out an existing space can get expensive, and often it's better to just start from scratch - so that's what I did.  I was fortunate to be introduced to the folks at Band, which is a creative agency based in Ahuriri, Napier.  They are based in their large re fitted warehouse facility, that also functions as a shared workspace for a number of and also lease space which also hosts a number of small to medium sized creative businesses.  It's a really great space with a top bunch of people, and so, settling on a good location for my build inside this space, I got to planning!

I had to really engage my 3rd form Tech Drawing skills on this puppy...

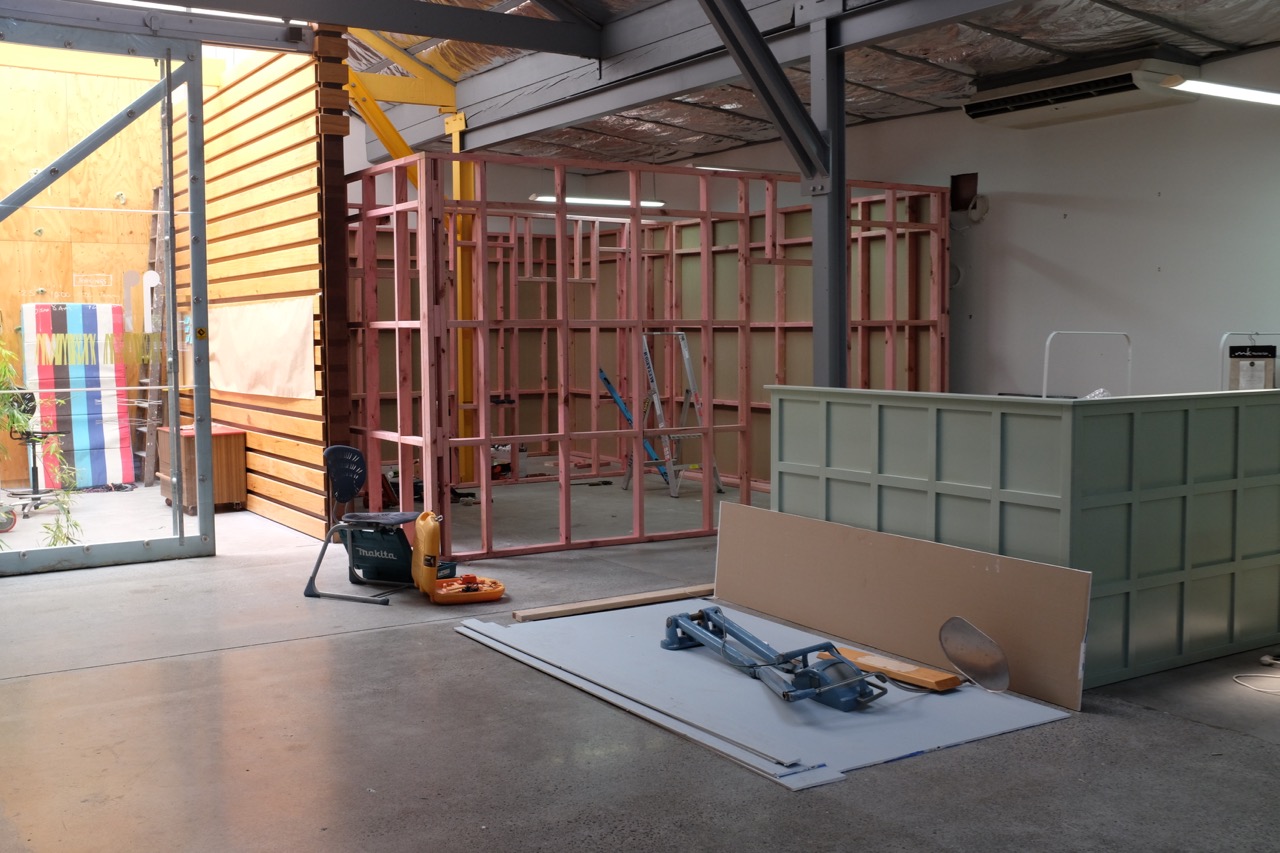
Here are some shots of the build process - firstly some planning and visualising in the existing alcove space.  Using this alcove area was key because it provided me with 3 existing walls to build within.  This saves cost when you are building a double walled structure!

View fullsize DSCF6726.jpg
View fullsize DSCF6728.jpg
View fullsize DSCF6730.jpg
View fullsize DSCF6731.jpg

Next, the framing goes up and insulation goes in.  You can see in the first picture the two rear walls are built in reverse, with two layers of gib on the back, leaving the framing and then insulation exposed internally.  These are to be my slat resonator walls that give a combination of high and mid frequency range sound absorption.

View fullsize DSCF6912.jpg
View fullsize DSCF6920.jpg
View fullsize DSCF6921.jpg

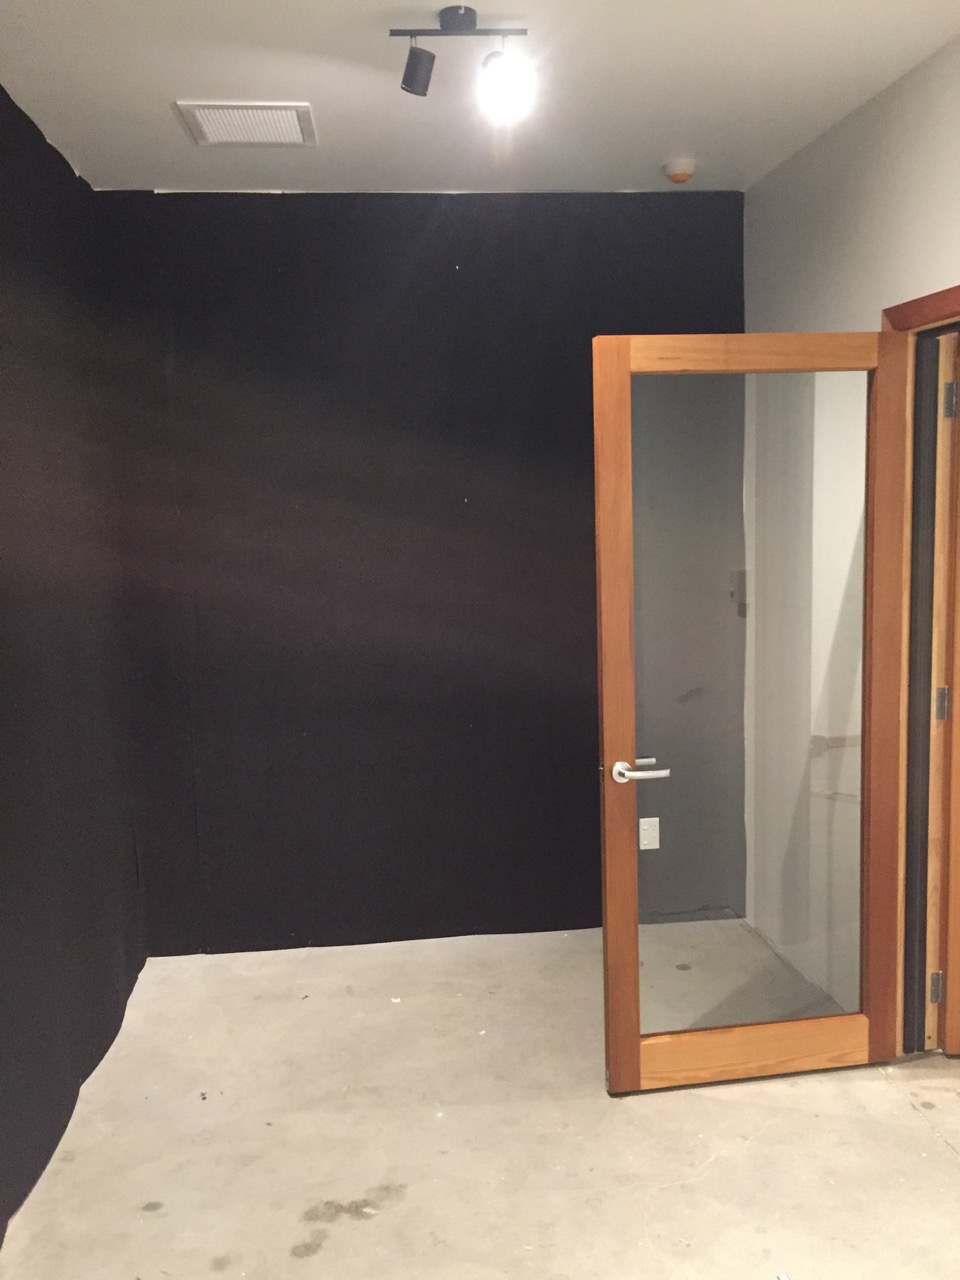
Then Gib!  2 layers of 13mm Noiseline with Green Glue in between.  The ceiling is also 2 layers of 13mm Noiseline but hung on Quiet Clips to increase sound proofing. (as seen in the last photo)

View fullsize DSCF6990.jpg
View fullsize DSCF6917.jpg
View fullsize DSCF6992.jpg
View fullsize IMG_0247.jpg

Slap a bit of paint round, windows and doors in.  Studio window is 2 panes of glass, one 10mm thick and the other 6mm.  Booth doors to the booth are glazed with 6mm safety glass, and the main external doors are solid core, super heavy - sourced from the old Dannevirke Hospital of all places.  All the doors were also fitted with sound seals and Raven seals that drop from beneath the door when it closes.

Electrician has also been in at this stage so I now have light!  And air conditioning!  The studio has top of the line ducted air con in both rooms, which heats and cools as well as brings in fresh air, which is important because this puppy is air tight!  It's also the quietest kind of air conditioning you can get.

Also shown is the fabric going up over the insulation.

View fullsize DSCF7100.jpg
View fullsize IMG_0305.jpg
View fullsize IMG_0306.jpg
View fullsize IMG_0304.jpg

I learned that for 90% of the build process, the place looks like an absolute dump, then in that last 10% it all comes together and start to look like something.  All the skirtings and architraves are native Beech.  I found a great second hand building/timber supplier who had a secret stash of old native Beech straight from the mill.  I had it thicknesed/planed and it came up beautiful with a bit of oil.  My slat resonator panels will also be made form this Beech when they go in.

View fullsize IMG_0308.jpg
View fullsize IMG_0303.jpg
View fullsize IMG_0317 2.jpg
View fullsize IMG_0315.jpg

Starting to get some gear in at last...

View fullsize IMG_0319 2.jpg
View fullsize IMG_0320 2.jpg

A few external trimmings...

View fullsize IMG_0251.jpg
View fullsize IMG_0261.jpg
View fullsize IMG_0538.jpg
View fullsize IMG_0537.jpg

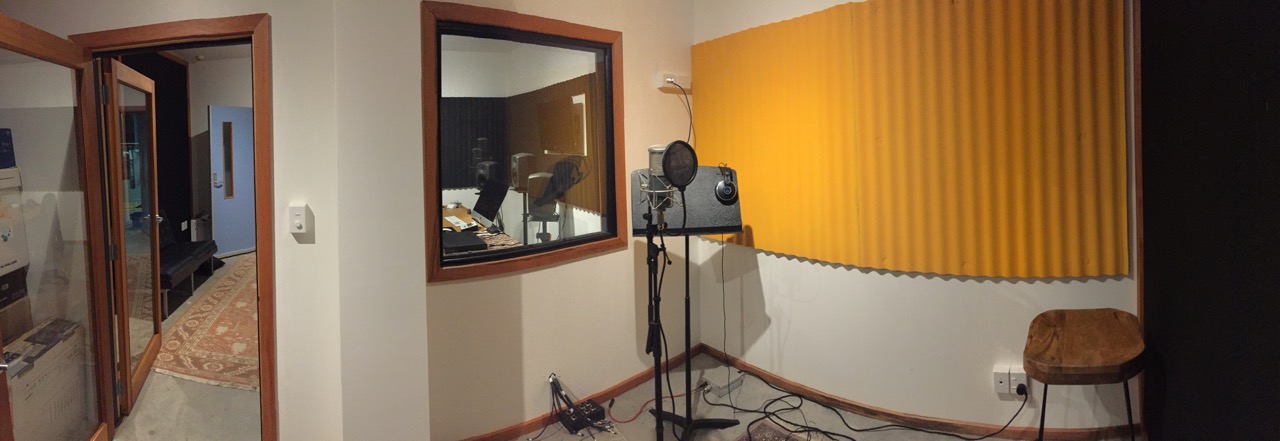
And here are a couple of shots of the rooms as they are today.  The Slat Resonator walls are yet to be finished, as I'm getting the feel of the rooms and what frequencies I need to target with them.  So far so good though, I couldn't be happier with how they've turned out.

View fullsize Studio-Main.jpg
View fullsize Booth_for_Web.jpg
categories: Studio Build
Wednesday 10.11.17
Posted by Jonny Pipe
 

Studio Upgrade: 5.1 Surround Mixing and Monitoring

One of my plans for the new studio here in Napier was to set up for 5.1 surround mixing and monitoring.  This year I've achieved that, and have been putting the system to good use working with Screen Vistas re mixing and ensuring quality control across their national cinema advertising.

I already had two Genelec 8240A monitors so for the upgrade the logical step was to carry on with Genelec for the rest of the system.  I now have an 8340 (the same as an 8240A but the newer model) for the Centre channel and 2 8330 monitors for the L and R surrounds.  The subwoofer is a 7360A Smart Active Subwoofer.
 

This isn't exactly my system but gives you the idea of what they look like!

Because of the additional channels needed for 5.1 mixing I also had to upgrade my interface, and chose to go with the Universal Audio Apollo 8.  My basic reasoning for this was that I already have the Apollo Twin and love the sound and usability of UA's software and plugins.  You can link the two units together via a Thunderbolt cable, which allows you to use the great wee Twin interface as a master monitor controller, and also adds their DSP chips together to give greater processing power for the UAD plugins.

Universal Audio Apollo 8

But wait!  There was one more upgrade I needed.  Since the start of my business I had always used the standard version of Pro Tools, without the need for the additional multichannel mixing capabilities or other nice features that HD has.  But once you get into surround then you have to use Pro Tools HD, so I now run PT HD 12, which has been great - some super useful features like VCA's and Clip Effects just make mixing so much easier and faster!

I'm very happy with how the system sounds and performs - the only downside is that I won't be getting Xmas or Birthday presents for the next few years! Ouch! :)

categories: Gear, Studio Build
Tuesday 08.01.17
Posted by Jonny Pipe
 

The Garage Audio - Open for business!

The Garage.

The Garage.

I'm super pleased to announce that now, after months of hard work, my studio is ready to go. It's been a long road for me, to finally get to this point of having my own business to operate from.  I've worked with a lot of people over the past 5 years or so, and without their support I wouldn't have been able to get this far.  So thanks y'all - you know who you are...Geeze... I told myself I wasn't going to get emotional...

Anyway, all the demolishing, building, insulating, gibbing, plastering, painting and acoustic treating has come together and The Garage Audio is now good to go.  I'll be catering to mainly commercial production, voiceover recording and audio post production, but I'm also dead keen to keep recording, mixing and producing music.

Why The Garage? Well I'm a fan of the 'call it what it is' buzz, and guess what?  It's in my garage.  A pretty new garage though I might add.  The initial space was a sleepout, complete with bathroom and toilet facilities, so it only took a little restructuring to get it the way I wanted.

Being in a suburban location, soundproofing was always going to be essential (neighbourhood dogs and lawnmowers...)  so I really put a lot of effort into finding the best way to keep any noise out.  Using a combination of Silencer batts, Gib Rail (resilient rail), 2 layers of 13 mm noiseline Gib, sound stop acoustic sealant and laminated double glazing for any glass, it's worked very well, creating a quiet oasis in sunny Spreydon :-)

If you are interested in coming to check it out or you'd like to talk about a project, please drop me an email or give me a call.  I'd love to help.

categories: Studio Build
Thursday 10.18.12
Posted by Jonny Pipe